In my previous post titled OpenStack Icehouse on Fedora 20 using packstack on home PC, I list the steps I followed to install Openstack Icehouse on home network. This was mostly working from the command line of the Openstack PC.
This posting is part 2. With the installation from part 1, I can now use the Openstack Dashboard. It is a nice web interface that contains straight forward menus. In the sections below, I will show screen captures from a web browser connected to the Dashboard; I will also show some command line text from a putty window.
This writeup will show steps for setting up a public subnet that links Openstack to my home network and setting up a private subnet for my guest instances to use. Then I will show how to create an instance using the bare-bones cirros image. And finally, I’ll install into the image repository a Fedora 20 cloud image and spin it up with a basic web server.
Since Openstack and the Openstack Dashboard are new to me, I do all of this with the generous help of the references listed below, especially recognizing Seth Jenning’s excellent Openstack Icehouse on Fedora 20 using RDO video.
Create a public network.
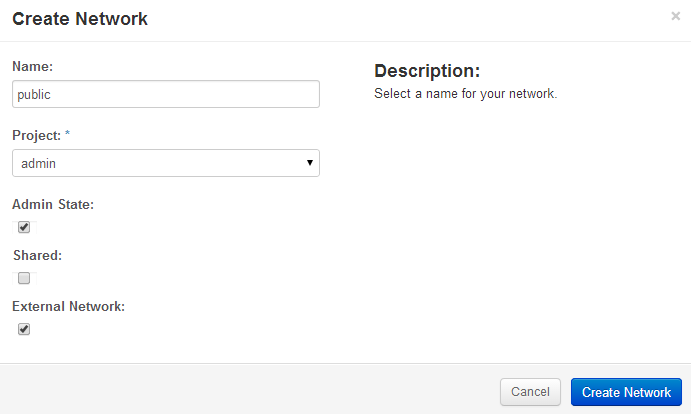
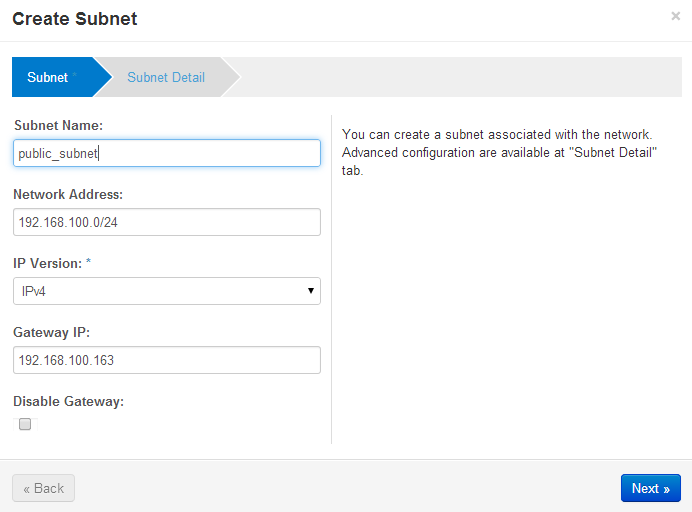
Starting with the Openstack Dashboard, logged in as admin, create a public network. My home network is 192.168.100.0/24. The IP address 192.168.100.163 is the address of my home router, gateway to the internet. My Openstack Icehouse host is 192.168.100.154. And Openstack needs a subnet, referred to as public, that sits in this address range.
The naming convention of calling the network 192.168.100.0/24 public started with the packstack install scripts. In the context of Openstack, this network is the one with a gateway to the internet and thus it is referred to as public, even though we know the internet defines 192.168.x.x IP addresses as private.
Openstack Dashboard Menu: Admin->Networks->Create Network
Openstack Dashboard Menu: Admin->Networks->public->Create Subnet
Openstack Dashboard Menu: Admin->Networks->public->Create Subnet 2
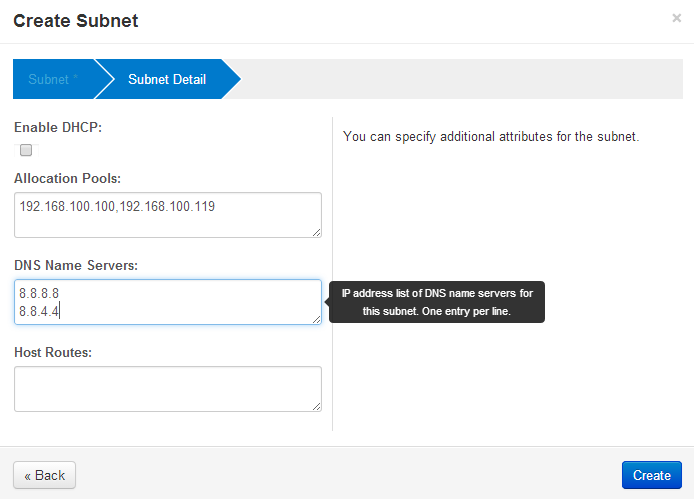
Create a private subnet
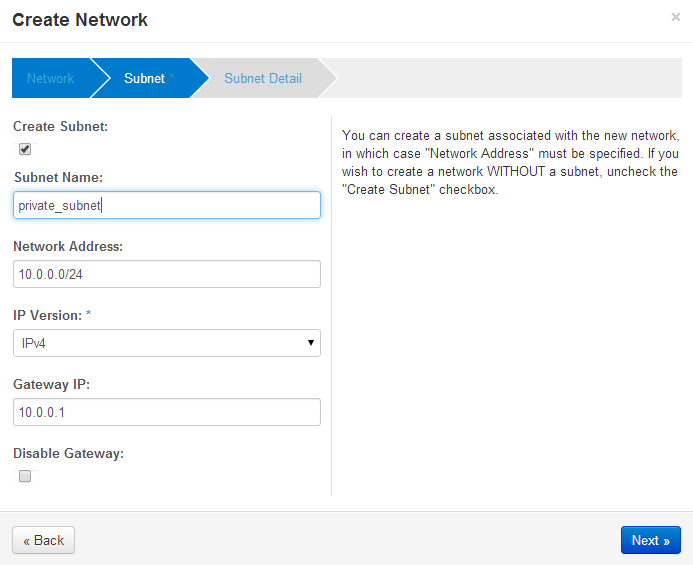
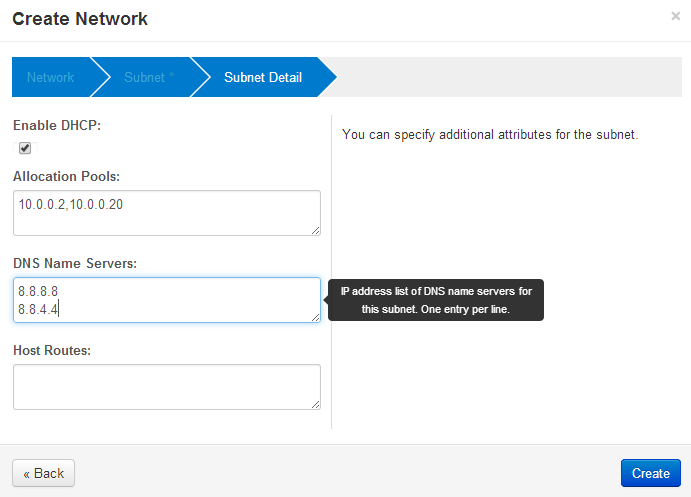
Next, create a subnet that is private to the Openstack host. The addresses must be different from the public_subnet. These addresses will never leave the Openstack host and it’s underlying Open vSwitch network address space. The references use 10.0.0.0/24 as the network and 10.0.0.1 as the gateway address — and that’s what I use below. Further, the guest instances each need to be given an IP address, and 10.0.0.2, 10.0.0.20 address are what I choose to be the range for a DHCP address pool.
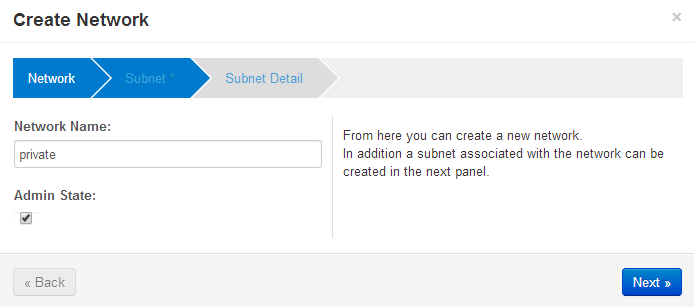
Openstack Dashboard Menu: Project->Network->Network Topology->Create Network — “private”
Openstack Dashboard Menu: Project->Network->Network Topology->Create Network->Subnet
Openstack Dashboard Menu: Project->Network->Network Topology->Create Network->Subnet Details
Create a router
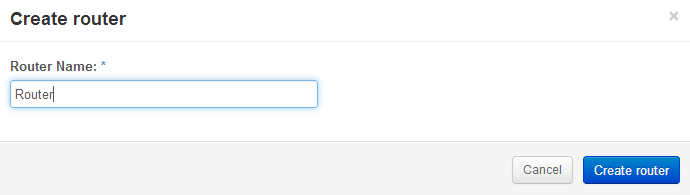
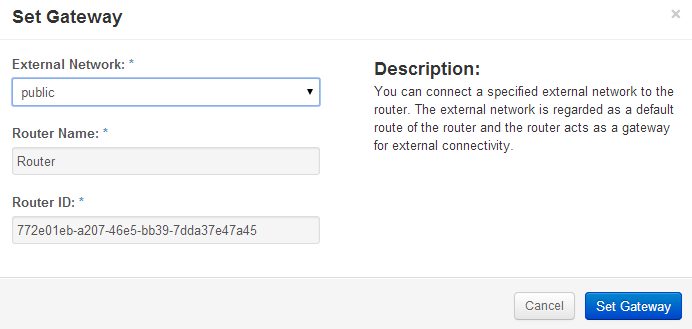
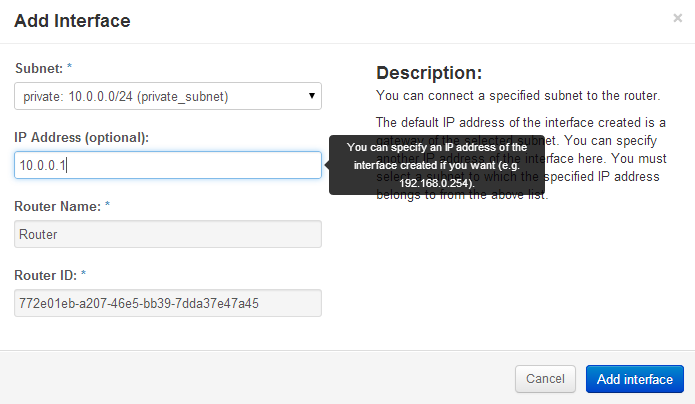
Ok, there’s a public and a private subnet defined. Openstack Dashboard has a really simple way to connect them together with a router function. Create a router, define a default gateway and then add interfaces to private subnets.
Openstack Dashboard Menu: Projects->Network Topology->Create Router
Openstack Dashboard Menu: Project->Routers->Set Gateway
Openstack Dashboard Menu: Project->Routers->router->Add Interface
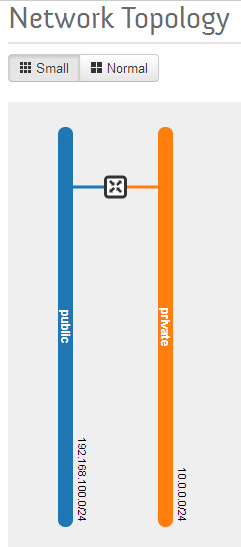
Verify Network Topology
All the steps upto this point were building a network into which virtual machines connect to the home LAN. Run the Dashboard command below to see two subnets connect to a router. The public subnet is on the home LAN. The private subnet is the address space where the guests instances will connect.
Openstack Dashboard Menu: Project->Network Topology
Setup Security Group Rules
The references suggest that for trial/learning purposes, the Security Group Rules should be wide open. The idea is while learning the technology, the security settings can obscure basic setup issues. In the long run, this needs to be managed more carefully.
First, remove the default rules that packstack setup, then install rules that permit incoming and outgoing TCP/UDP/ICMP — all ports.
Openstack Dashboard Menu: Project->Compute->Access and Security->default
Delete all the default rules and rebuild the rules so that the Security Group Rules table looks as follows:

Setup an ssh key pair
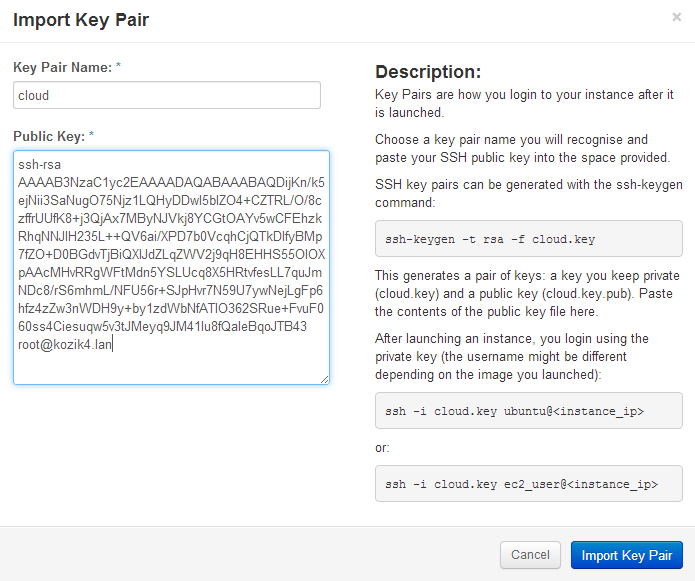
Using the normal ssh tools, make an ssh public and private key pair. The Openstack Dashboard lets you cut / paste your own public key into the project. The instances that get created will have the public key pre-installed into it. To access instances that Openstack creates, use the private key as an option in an ssh command line.
Go to the root login of the Openstack host, at the command prompt create a key and copy the public key into the clipboard.
[root@kozik4 ~]# ssh-keygen -t rsa -f cloud.key
Generating public/private rsa key pair.
Enter passphrase (empty for no passphrase):
Enter same passphrase again:
Your identification has been saved in cloud.key.
Your public key has been saved in cloud.key.pub.
The key fingerprint is:
36:37:4d:d3:5b:82:45:53:48:98:24:00:8b:0b:3b:06 [email protected]
The key's randomart image is:
+--[ RSA 2048]----+
|      .......==o.|
|     . .   .o+.. |
|E . . .     + o .|
| . o .     o . + |
|  + .   S o . .  |
| . .   . o .     |
|                 |
|                 |
|                 |
+-----------------+
[root@kozik4 ~]# ls
anaconda-ks.cfg  ifconfig5.out         packstack-answers-20140803-201418.txt
cloud.key        installpackstack.log  packstack.log
cloud.key.pub    keystonerc_admin      rdorelease.log
ifconfig1.out    keystonerc_demo       runpackstack.log
ifconfig2.out    ovs1.out              yumupdate.log
ifconfig3.out    ovs2.out
ifconfig4.out    ovs3.out
[root@kozik4 ~]# cat cloud.key.pub
ssh-rsa AAAAB3NzaC1yc2EAAAADAQABAAABAQDijKn/k5ejNii3SaNugO75Njz1LQHyDDwI5blZO4+CZTRL/O/8czffrUUfK8+j3QjAx7MByNJVkj8YCGtOAYv5wCFEhzkRhqNNJlH235L++QV6ai/XPD7b0VcqhCjQTkDIfyBMp7fZO+D0BGdvTjBiQXIJdZLqZWV2j9qH8EHHS55OlOXpAAcMHvRRgWFtMdn5YSLUcq8X5HRtvfesLL7quJmNDc8/rS6mhmL/NFU56r+SJpHvr7N59U7ywNejLgFp6hfz4zZw3nWDH9y+by1zdWbNfATIO362SRue+FvuF060ss4Ciesuqw5v3tJMeyq9JM41lu8fQaIeBqoJTB43 [email protected]
[root@kozik4 ~]#
In putty screen like the above example, select the text output from the ‘cat cloud.key.pub’ command and paste into the Openstack Dashboard as follows.
Openstack Dashboard Menu: Project->Access & Security->Key Pairs->Import Key Pair
Launch Test Instance ‘cirros’ and assign floating IP
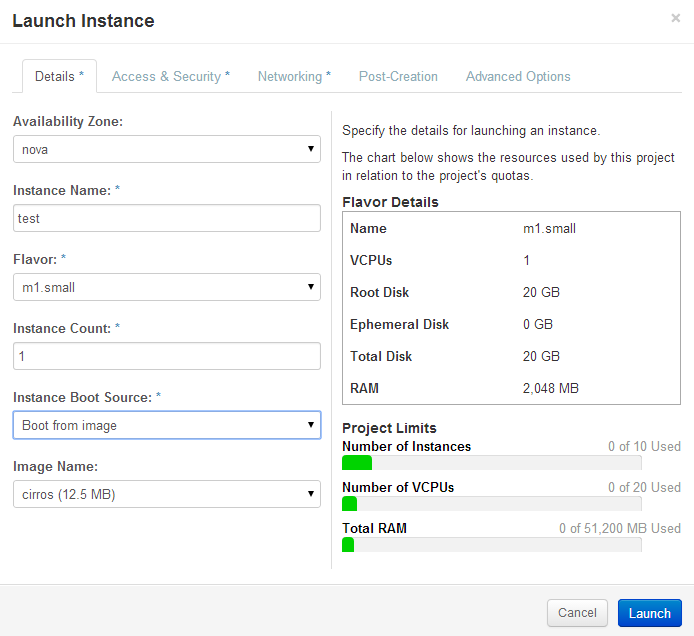
To help verify that the Openstack packstack installed correctly, spin-up the barebones cirros image. This image is a really small linux distribution. I’ve never heard of cirros, but I get the purpose of it. My initial setup had troubles, and cirros helped me trouble shoot basic setup problems. I was glad the initial install pulled it in.
The following steps startup an instance, link it to the private subnet, and map the private IP address of the instance to a floating IP address on the public subnet. Floating IP addresses were new to me, and it wasn’t obvious how they should be used, at first. I think of it as a generalized NATing function, that lets me hide my home network topology from the Openstack instances.
Openstack Dashboard Menu: Project->Images->Launch->Details
Connect the instance to the private subnet. Note: the web page below requires you to drag the private line and drop it into the Selected Networks cyan-colored bar.
Openstack Dashboard Menu: Project->Images->Launch->Networking

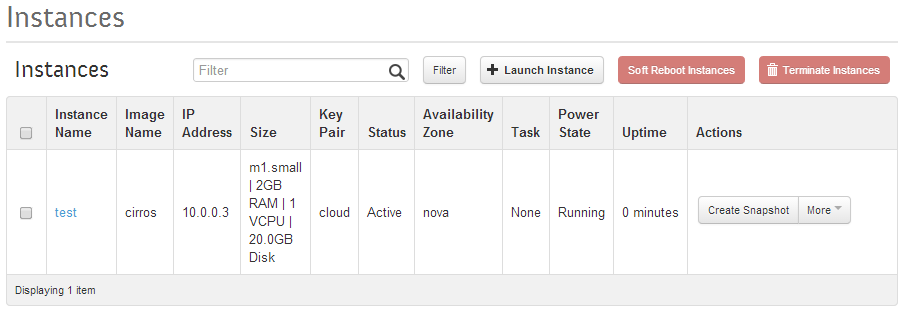
Verify the test instance is running:
Openstack Dashboard Menu: Project->Instances
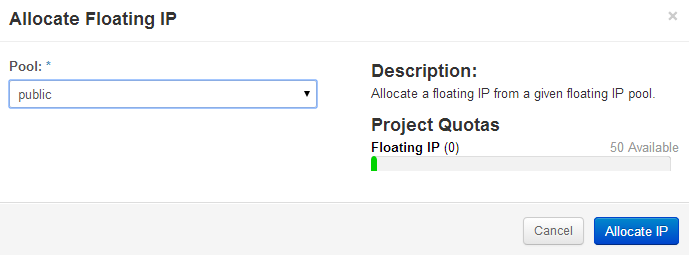
Allocate a Floating IP address
Openstack Dashboard Menu: Projects->Access & Security->Floating IPs->Allocate IP to Project
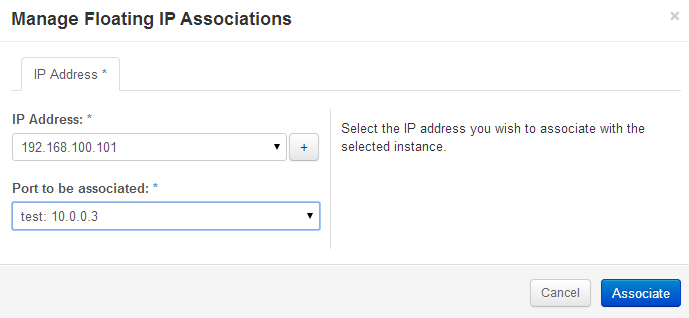
Associate the instance’s private IP address to an IP address on the public subnet.
Openstack Dashboard Menu: Project->Access & Security->Floating IP->Associate
Verify that the instance has two IP addresses and is running ok.
Openstack Dashboard Menu: Project->Instance
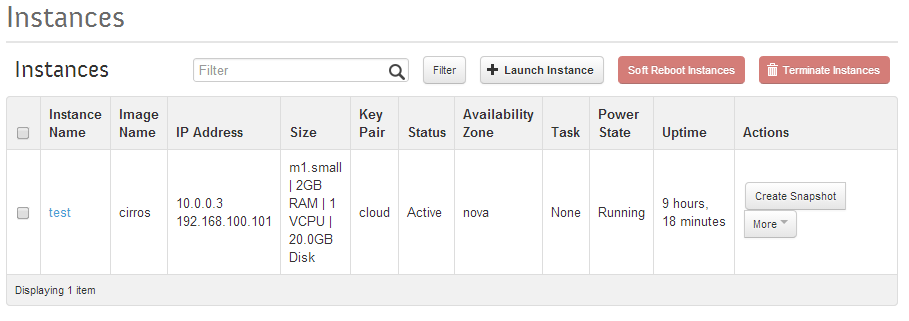
Go back to the 192.168.100.154 host putty prompt (root login, home directory). Verify that we can setup an ssh connection to the new instance. The default login id is cirros. The Instances web page above tells us to use the 192.168.100.101.
# ssh -i cloud.key [email protected]
The authenticity of host '192.168.100.101 (192.168.100.101)' can't be established.
RSA key fingerprint is 34:51:4c:22:c3:67:d3:47:38:83:c2:ee:55:0f:4b:e5.
Are you sure you want to continue connecting (yes/no)? yes
Warning: Permanently added '192.168.100.101' (RSA) to the list of known hosts.

$ ifconfig
eth0      Link encap:Ethernet  HWaddr FA:16:3E:62:7D:36
          inet addr:10.0.0.3  Bcast:10.0.0.255  Mask:255.255.255.0
          inet6 addr: fe80::f816:3eff:fe62:7d36/64 Scope:Link
          UP BROADCAST RUNNING MULTICAST  MTU:1500  Metric:1

lo        Link encap:Local Loopback
          inet addr:127.0.0.1  Mask:255.0.0.0
          inet6 addr: ::1/128 Scope:Host
          UP LOOPBACK RUNNING  MTU:16436  Metric:1

$ ping yahoo.com
PING yahoo.com (98.139.183.24): 56 data bytes
64 bytes from 98.139.183.24: seq=0 ttl=47 time=49.484 ms
64 bytes from 98.139.183.24: seq=1 ttl=47 time=121.366 ms
64 bytes from 98.139.183.24: seq=2 ttl=47 time=81.164 ms
Note: the ifconfig shows that the instance only knows about the private_subnet address 10.0.0.3. Also, an important test to verify: check that the instance can access the internet, I used ping yahoo.com.
Create a Fedora 20 instance
 The cirros instance installation steps above helped to verify that basic functionality worked. But cirros is not a linux distribution I want to use; I want to use the latest version of Fedora. In this section I repeat some of the steps from the previous section to get a Fedora 20 instance started. There’s enough different here that I wanted to document it.
From the Fedora In the Cloud web page, right click the 64-bit qcow2 image and “Copy Link Address.” The Images page has an option to import new images using a URL.
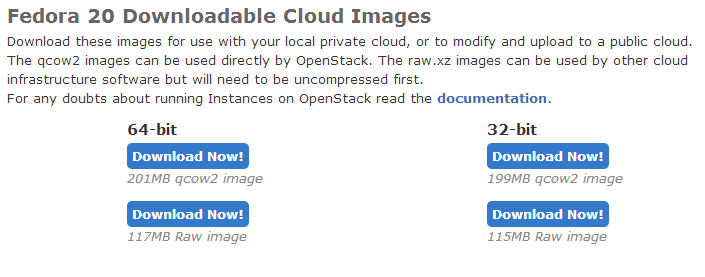
Create an image from this URL:
Openstack Dashboard Menu: Project->Create Image

Following the same steps as the cirros image, launch the Fedora 20 image.
Openstack Dashboard Menu: Project->Instance->Launch Instance
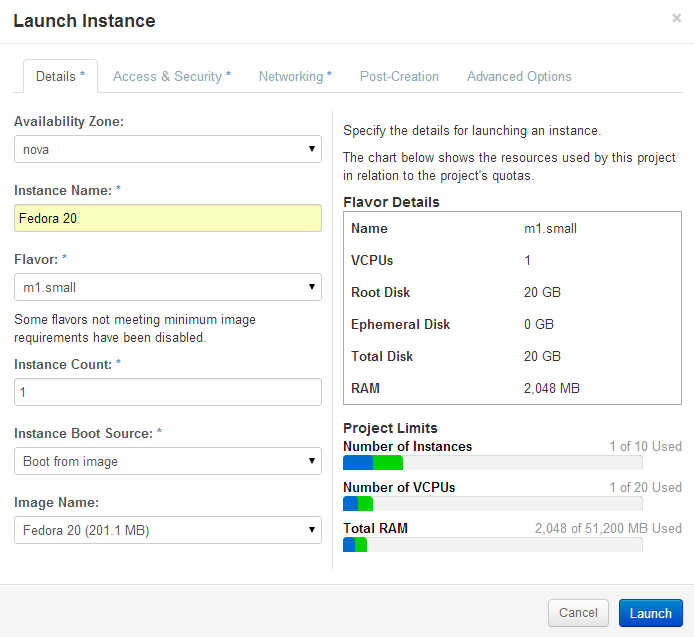
Be sure to click the Networking tab and select private subnet, then click on Launch.
Once the instance is running, allocate a Floating IP. Go to the Projects->Access & Security->Floating IP menu. First run Allocate IP to Project then Manage Floating IP Associations for the Fedora 20 instance… just like we did for the cirros instance.
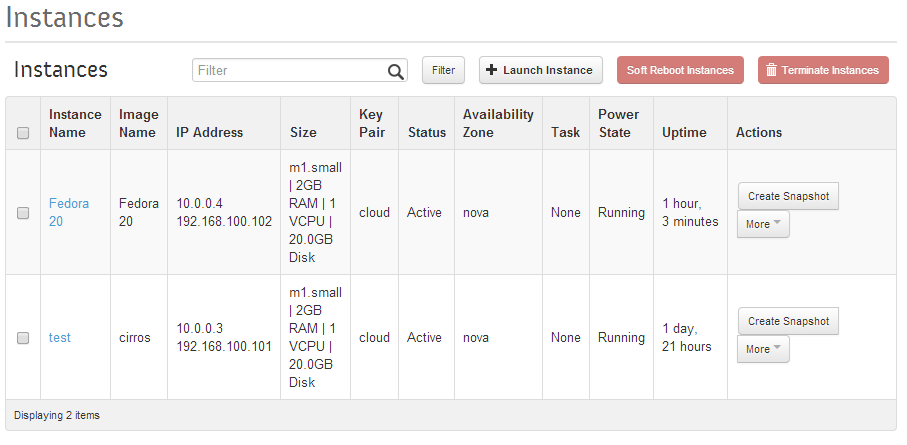
The Instance Dashboard page now shows 2 instances.
Openstack Dashboard Menu: Project->Instance
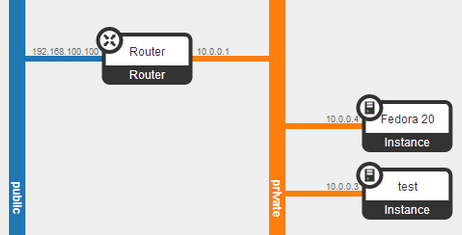
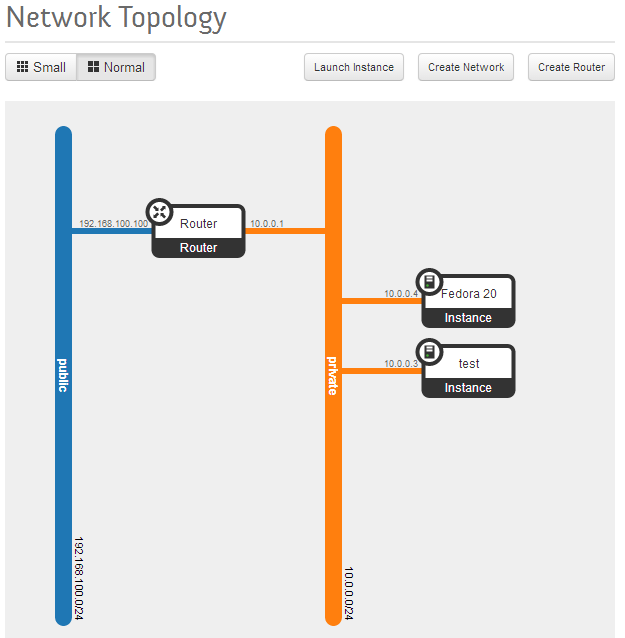
And the Network Topology page gives a nice picture of how everything is wired together.
Openstack Dashboard Menu: Project->Network->Network Topology
So, just like with cirros, go to the Openstack host root login prompt and ssh to the Fedora instance. The Instance page above show 192.168.100.102 as the IP address.
# ssh -i cloud.key [email protected]
The authenticity of host '192.168.100.102 (192.168.100.102)' can't be established.
RSA key fingerprint is 2e:b3:7b:6b:06:43:cf:d5:95:95:49:38:5f:ab:20:39.
Are you sure you want to continue connecting (yes/no)? yes
Warning: Permanently added '192.168.100.102' (RSA) to the list of known hosts.
[fedora@fedora-20 ~]$ ifconfig
eth0: flags=4163<UP,BROADCAST,RUNNING,MULTICAST>  mtu 1500
        inet 10.0.0.4  netmask 255.255.255.0  broadcast 10.0.0.255
        inet6 fe80::f816:3eff:fe9b:baf5  prefixlen 64  scopeid 0x20
        ether fa:16:3e:9b:ba:f5  txqueuelen 1000  (Ethernet)

lo: flags=73<UP,LOOPBACK,RUNNING>  mtu 65536
        inet 127.0.0.1  netmask 255.0.0.0
        inet6 ::1  prefixlen 128  scopeid 0x10
        loop  txqueuelen 0  (Local Loopback)

[fedora@fedora-20 ~]$ ping yahoo.com
PING yahoo.com (206.190.36.45) 56(84) bytes of data.
64 bytes from ir1.fp.vip.gq1.yahoo.com (206.190.36.45): icmp_seq=1 ttl=49 time=1         06 ms
64 bytes from ir1.fp.vip.gq1.yahoo.com (206.190.36.45): icmp_seq=2 ttl=49 time=1         56 ms
64 bytes from ir1.fp.vip.gq1.yahoo.com (206.190.36.45): icmp_seq=3 ttl=49 time=1         02 ms
Note: the Fedora guest instance only knows the private address 10.0.0.4. The default login id, fedora, has sudo permissions and access to the root login is done with a ‘sudo su -’ command. It is important also to verify that it can talk to the outside world, and thus verify that ping yahoo.com works.
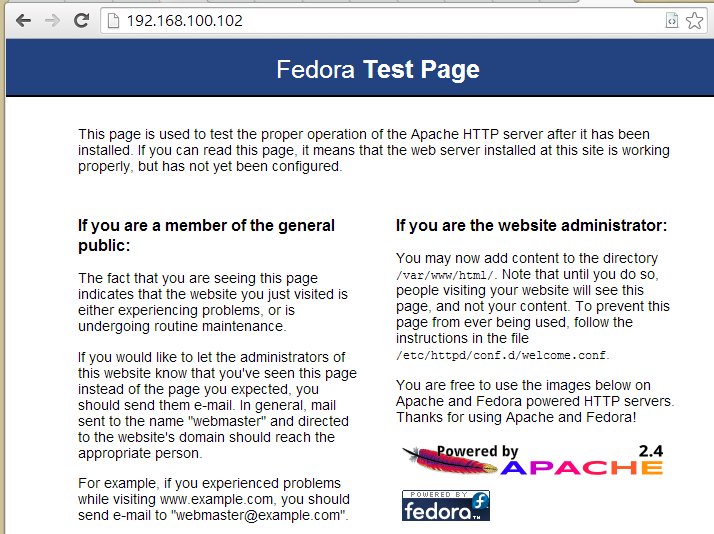
To further test my Fedora 20 instance, I switched over to the Fedora 20 instance root login and installed apache:
[fedora@fedora-20 ~]$ sudo su -
[root@fedora-20 ~]# yum groupinstall "Web Server"
[root@fedora-20 ~]# systemctl enable httpd.service
[root@fedora-20 ~]# systemctl start  httpd.service
From here, I go to another PC in my home network and verify that the default web server works.